Staining a fence is more than just a weekend project—it’s about protecting a major investment from the harsh Texas sun and weather. It’s one of those jobs that delivers a huge payoff, both in looks and in the longevity of your fence.
Your Blueprint for Staining a Wood Fence
When I first started staining fences here in Abilene, the sheer size of the job felt overwhelming. Staring at hundreds of feet of weathered wood, it’s easy to wonder where to even begin.
The secret I’ve learned over the years is to stop thinking about it as one massive task. The key is breaking it down into a clear, step-by-step plan. This guide is that plan. We'll walk through everything from the crucial prep work to applying that final coat like a pro, ensuring your fence not only looks fantastic but is also shielded from the elements.
Remember, staining is primarily about preservation. A quality stain does more than just add color—it sinks deep into the wood to block damaging UV rays and repel the moisture that turns fences gray and brittle.
Seeing the Project from Start to Finish
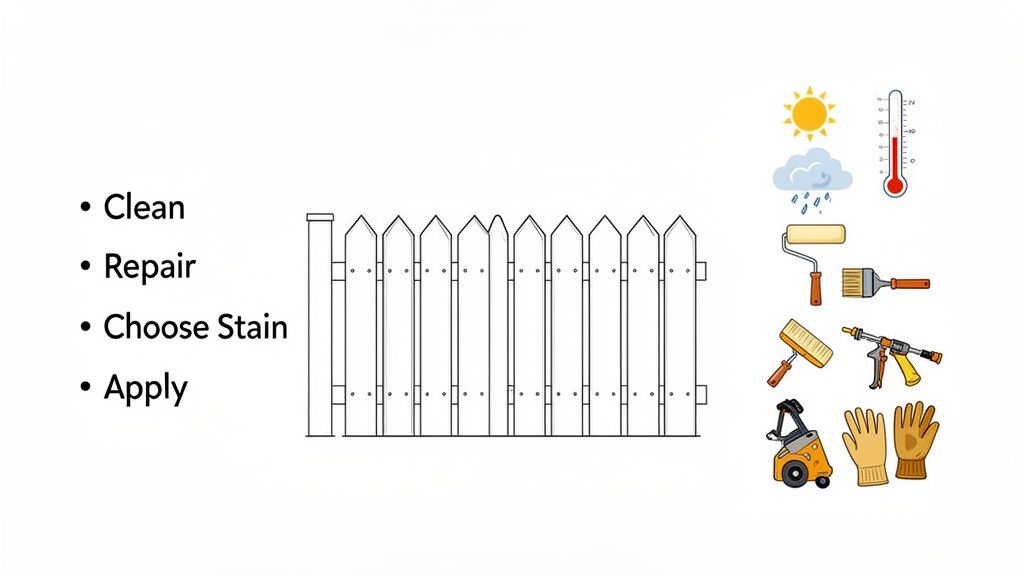
To keep things from getting chaotic, it helps to see the whole project laid out in simple phases. This approach turns a big job into a series of manageable wins. I always make a quick checklist before I even buy my stain; it’s a simple habit that has saved me countless mid-project trips to the hardware store.
There's a reason staining is the industry standard. The global wood fencing market hit USD 8.71 billion in 2024, and a staggering USD 7.03 billion of that was spent on protective stained coatings. It's not just a trend; it's a proven method for preventing oxidation and keeping the wood's natural character alive.
To give you a clear picture of the workflow, I've put together a quick overview of the entire process.
Fence Staining Project at a Glance
This table breaks down the project into its core stages. Think of it as your high-level roadmap to a flawless finish that will last for years.
| Phase | Key Actions | Ideal Timing |
|---|---|---|
| Preparation | Inspect for damage, make repairs, and thoroughly clean the wood to remove dirt and gray fibers. | A dry day with temps between 50-90°F. |
| Material Selection | Choose your stain (oil vs. water-based) and application tools (sprayer, brush, roller). | After assessing your fence's age and wood type. |
| Application | Protect surrounding areas, apply stain evenly, and back-brush to ensure deep penetration. | A calm, overcast day with moderate temperatures. |
Following these phases will help you stay organized and efficient. When done right, a freshly stained fence doesn't just protect your property—it can seriously boost your home's curb appeal and overall value.
Getting Your Fence Ready for Stain
If there’s one thing I’ve learned over years of staining fences, it’s this: your final result is almost entirely decided before you even open a can of stain. Rushing the prep work is the number one reason a stain job fails. A good rule of thumb is that preparation accounts for at least 80% of the job.
I learned this the hard way on one of my first big projects. I was so eager to see that beautiful new color that I just gave the fence a quick rinse and went straight to staining. It looked fantastic… for about six months. By the next spring, it was already starting to peel and flake. I had to strip the whole thing and start over, all because I didn't give the stain a clean, sound surface to grab onto.
The point of all this prep work isn't just to make the fence look clean. It's about creating the perfect canvas. When you prep correctly, the stain can soak deep into the wood grain, giving you that rich, even color and long-lasting protection you're after.
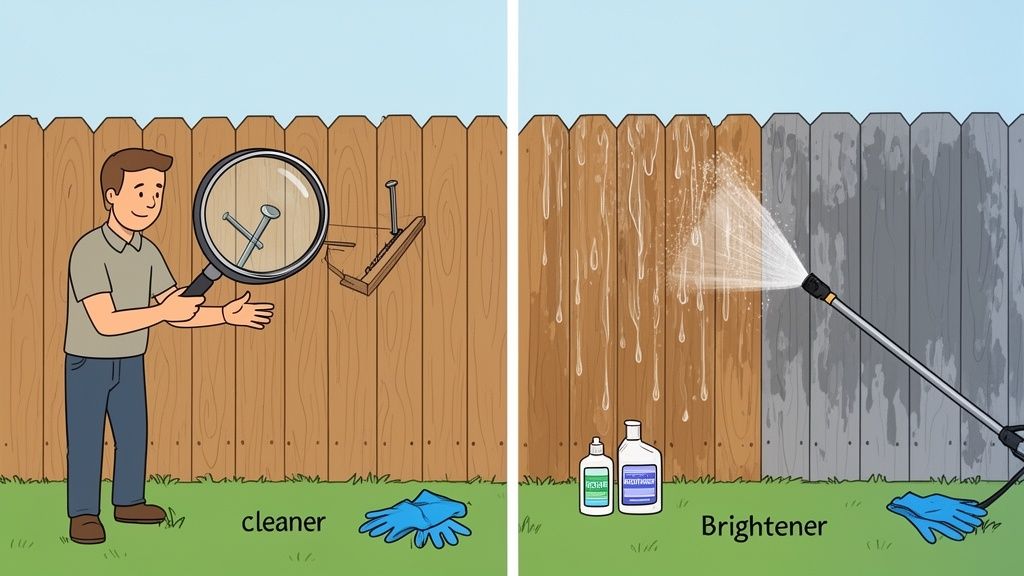
Start with an Honest Fence Inspection
Before you break out any tools, take a walk. Grab a notepad and inspect every single foot of your fence. I always do this about a week before I plan to start the project. That gives me plenty of time to deal with any surprises.
You’re looking for the usual suspects:
- Loose or Warped Boards: Give each picket and rail a gentle push. Are they wobbly?
- Popped Nails or Screws: Slide your hand carefully over the boards. If you feel anything sharp, hammer it back in or, even better, replace it with a deck screw.
- Rot and Insect Damage: Pay extra attention to the areas near the ground. Use a screwdriver to poke at any spots that look soft, dark, or crumbly.
- Gate Hardware: Check the hinges and latches. Make sure they’re still tight and working properly.
It's crucial to make these repairs before you start cleaning. Trust me, there’s nothing more frustrating than trying to replace a board on a fence you just finished staining.
Do I Really Have to Clean It First?
I hear this question all the time, and the answer is always a firm yes. Trying to stain over dirt, mildew, or that silvery, grayed wood is like painting over rust—it just won't stick. The new stain will fail, and you’ll be stuck stripping it all off and starting from scratch.
That gray layer you see on an old fence isn't just weathered—it's dead wood fiber. It has no integrity, and stain can't bond to it. You have to get that layer off to expose the healthy wood underneath.
Even brand-new fences need a good cleaning. Fresh lumber often has a slick surface from the milling process called "mill glaze," which can prevent stain from penetrating. A quick wash is all it takes to open up the wood’s pores and get it ready.
The Right Way to Clean and Brighten the Wood
For most fences here in West Texas, a pressure washer and a good wood cleaner are all you need to work wonders.
What's the right pressure washer setting?
Start low and go slow. A setting between 1,500 and 2,000 PSI is usually perfect. Always begin with a wide, fan-style nozzle (a 25- or 40-degree tip is best) and stand a few feet back. Keep the wand moving in smooth, even strokes that follow the grain of the wood. If you hold it in one place for too long, you’ll carve permanent marks into the boards that will scream at you through the new stain.
If you’re dealing with stubborn mildew (those ugly green or black blotches), you’ll need a dedicated wood cleaner. Apply it according to the directions, let it sit for about 15-20 minutes, then gently pressure wash it away. You’ll be amazed as years of grime and gray wash off, revealing the wood's original color.
After cleaning, I always take one final step: applying a wood brightener. This product does more than just brighten the wood; it also neutralizes the cleaner and balances the wood’s pH, helping the true color of your stain pop. You can find more tips for breathing new life into old wood in our guides on professional wood care. It’s a small extra step that makes a huge difference in the final look.
Choosing Your Stain and Application Tools
Walking down the stain aisle at the hardware store can feel a bit like analysis paralysis. I've been there. You're faced with a wall of cans, all promising the best results. Let's cut through the noise and figure out what's actually right for your fence.
There's no single "best" stain for every job, but there is always a best one for your specific project. The right choice hinges on your type of wood, the final look you're after, and frankly, how much future maintenance you're willing to sign up for.
Oil-Based vs. Water-Based Stains
Your first fork in the road is deciding between an oil-based and a water-based stain. I’ve used both extensively on fences all over Abilene, and each has its moment to shine.
Oil-Based Stains: This is the traditional workhorse, and my personal favorite for most fence projects. Oil-based stains sink deep into the wood fibers, enriching the natural grain and providing fantastic water repellency. They dry slowly, which is actually a huge benefit on a hot Texas day, as it helps you avoid ugly lap marks.
Water-Based Stains: Don't count these out—they've come a long way. Modern water-based formulas offer excellent color retention and strong UV protection. They also dry much faster, have a lower odor, and clean up easily with just soap and water.
The global wood coating market, which is projected to hit USD 18.38 billion by 2030, shows a strong trend toward water-based options, which recently grew at a 6.7% rate. Still, oil-based stains, known for their performance on bare wood, are holding their own. You can see more data on these market trends at The Business Research Company.
Understanding Stain Opacity
Next up is opacity. This simply refers to how much of the wood grain shows through the stain. It’s all about the final look you want to achieve.
Transparent: Want to see every beautiful knot and grain pattern? This is your pick. It adds just a hint of color, making it perfect for new cedar or redwood. The trade-off is that it offers the least UV protection.
Semi-Transparent: This is my go-to for most fences. It strikes the perfect balance, adding rich color while still letting the wood's natural character come through. You get great looks and solid protection.
Semi-Solid: If your fence has a few cosmetic issues or color inconsistencies from old stains, this is a great choice. It has enough pigment to hide most of the grain while still allowing the wood's texture to show.
Solid Color Stain: This looks and acts more like paint, completely covering the wood grain. It provides the absolute best UV protection and is ideal for very old fences or when you want a uniform, modern color.
For my own cedar fence, I almost always land on a semi-transparent oil-based stain. It does a beautiful job of making that grain pop while giving it the durability to handle our intense sun.
Stain Type and Application Method Comparison
Deciding between stain types and the tools to apply them can feel overwhelming. This table breaks down the pros and cons of each to help you match the right products and tools to your specific fence project.
| Option | Pros | Cons | Best For… |
|---|---|---|---|
| Oil-Based Stain | Deep penetration, enriches wood grain, excellent water repellency, slow drying prevents lap marks. | Stronger odors, longer dry times, cleanup requires mineral spirits. | New or bare wood fences, especially in hot climates where a longer working time is beneficial. |
| Water-Based Stain | Low odor, fast drying, excellent color retention and UV protection, easy soap-and-water cleanup. | May raise wood grain, can dry too quickly in direct sun, less penetration than oil. | Re-staining projects, fences where low VOCs are a priority, and achieving vibrant colors. |
| Brush Application | Maximum control, pushes stain into wood pores, perfect for details and corners. | Extremely slow for large fences, physically demanding. | "Cutting in" around posts and hardware, back-brushing, and small, detailed fences or gates. |
| Roller Application | Faster than a brush on flat sections, applies a consistent coat. | Can be messy, ineffective on rough surfaces or between boards. | Smooth, flat fences with minimal gaps, like privacy fences with tongue-and-groove panels. |
| Sprayer Application | Incredibly fast, provides an even coat on large and irregular surfaces. | Requires extensive prep for overspray, has a learning curve, potential for waste. | Large-scale fence projects (over 100 linear feet) where speed is the top priority. |
No matter which combination you choose, the key is proper technique. A high-quality stain applied poorly won't last, but even a budget-friendly option can look great and perform well if you take your time.
I never tackle a fence project without a good quality 4-inch stain brush, even when I'm spraying. After spraying a section, I immediately go back over it with the brush. This technique, called back-brushing, is my non-negotiable secret weapon. It eliminates drips, works the stain deep into the pores of the wood, and ensures a uniform, professional finish that lasts.
Mastering Your Staining Application Technique
Alright, this is where all that prep work really starts to pay off. Your fence is clean, the wood is ready, and your stain is mixed. Now for the fun part—bringing that fence back to life.
Let's walk through the actual application and tackle some of the most common questions I hear from homeowners.
How Do I Avoid Getting Drips and Overspray Everywhere?
This is the first thing on my mind before I even pop the lid on a can of stain. A beautifully stained fence next to a splotchy concrete patio or discolored siding just isn't a finished job. I learned a long, long time ago that a few minutes of masking can save you hours of scrubbing and regret.
Here’s my non-negotiable game plan for protecting the surrounding area:
- Cover the House: Use painter's plastic or old-school drop cloths to shield any siding, windows, or sheds close to the fence. A little painter's tape along the edges will keep it secure.
- Protect Hardscaping: For surfaces like driveways, sidewalks, or pool decks, I always roll out rosin paper and tape it down. It's tougher than plastic and won't get nearly as slick if you step on it.
- Shield Your Plants: Gently drape lightweight tarps over any shrubs or flower beds lining the fence. Just be sure to pull them off as soon as you're done with that section so the plants can breathe.
It might feel like a tedious extra step, but trust me, this is what separates a DIY job from a professional one. You'll be glad you did it.
How Do I Prevent Ugly Lap Marks?
This is a big one, especially with our Texas sun beating down and drying things out fast. Lap marks are those dark, obvious lines you get when you apply fresh stain over an edge that has already started to dry.
The secret? Always maintain a wet edge.
This just means you never let the edge of your work dry out before you blend the next section into it. I do this by working in small, vertical sections—usually just 3 to 5 boards at a time. I stain those few boards completely from top to bottom before I even think about moving on. This approach keeps the leading edge of the stain wet, allowing for a seamless, beautiful blend.
This guide below is a fantastic visual for pairing the right tool with the right stain type, which is key to getting that flawless finish.
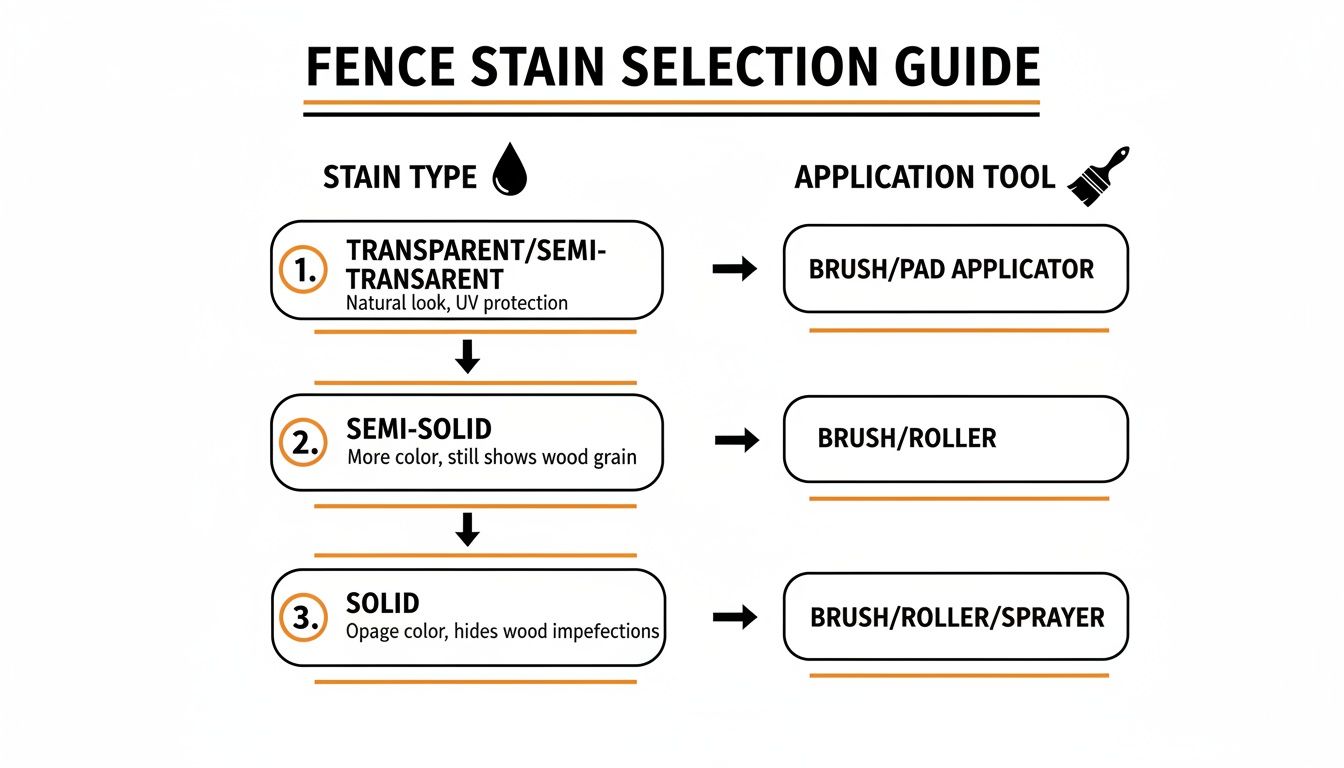
As you can see, the tool you use is just as important as your technique. The right combination makes all the difference.
Why Is Back-Brushing So Important?
If you're using a sprayer to get the job done faster, you cannot skip this part. I once watched a guy in my neighborhood spray his whole fence and call it a day. It looked fine from a distance, but within a year, the stain was peeling right off because it never really soaked into the wood.
Back-brushing is simply going back over the freshly sprayed area with a good stain brush. It’s not just for show; this motion is critical.
- It physically pushes the stain deep into the wood grain and pores, ensuring a deep bond instead of just a surface-level coating.
- It smooths everything out, eliminating drips, runs, and any unevenness from the sprayer.
Think of it this way: spraying gets the stain on the fence, but back-brushing gets it in the fence. That's the difference between a finish that looks good for a season and one that protects for years.
A sprayer is for speed, but a brush is for quality. On every single job, I follow the sprayer with a 4-inch stain brush in my other hand. This one step is the hallmark of a professional job and is non-negotiable if you want the stain to last.
How Many Coats of Stain Will I Need?
I get this question all the time, and my answer usually surprises people who are new to staining.
For most semi-transparent stains that are designed to penetrate the wood, one good coat is all you need. The goal is to let the wood soak up as much stain as it can possibly hold. If you try to apply a second coat over a surface that's already sealed, it won't be able to absorb it. The second coat will just sit on top, creating a sticky, shiny film that's almost guaranteed to fail and peel.
The main exception here is solid color stain, which acts more like paint. With a solid stain, you might need two thin coats for consistent color, but always follow the directions on the can.
For the vast majority of our semi-transparent jobs here in Abilene, one thorough, back-brushed coat is the professional standard. Once you're done, let it dry completely—which usually takes 24 to 48 hours in our climate. Just leave it alone until it's no longer tacky to the touch.
Budgeting Your DIY Project vs. Hiring a Pro
Alright, let's talk money and time. This is usually the point where homeowners pause and ask the big question: "Should I really do this myself, or just hire someone?" It's a classic dilemma, and honestly, there's no single right answer. Let's break down what each option really costs you—in both dollars and effort.
Breaking Down the Cost of DIY Fence Staining
Going the DIY route looks like the cheapest option on paper, and it can be. But don't just look at the price of a can of stain and call it a day. I remember my first big fence project; I was shocked by how many trips I made to the hardware store for things I hadn't accounted for.
Let's run some real-world numbers for a typical 150-linear-foot privacy fence:
- The Stain: This will be your biggest line item. For a fence this size, plan on needing around 5 gallons. Depending on the brand and quality you choose, you're looking at anywhere from $150 to $250.
- Tools and Supplies: Think brushes, rollers, paint trays, painter's tape, and drop cloths. It all adds up. A realistic budget here is $50 to $75.
- Prep Materials: You can't skip the cleaning. A good wood cleaner, and maybe a brightener, will run you another $20 to $40.
- Sprayer Rental: If you want to save your back and get an even coat, renting a sprayer is the way to go. A one-day rental usually costs between $75 and $100.
When you add it all up, a DIY job will likely cost you somewhere in the neighborhood of $300 to $465. And, of course, that doesn't include the value of your own time and sweat equity.
What to Expect When Hiring a Professional
On the flip side, you can hand the keys over to a professional crew. Yes, the initial quote will be higher, but you're paying for a whole lot more than just a guy with a sprayer. A pro bid typically covers everything: the power washing, any minor repairs, all the materials, and the expertise to get it done right and efficiently.
Nationally, the cost to professionally stain a fence can swing from $240 to $4,000, but most people land around the $1,900 mark. Labor rates are a big factor, usually falling between $50 and $110 an hour. According to a handy guide from Angi.com, even DIYers have extra costs like gloves and masks that can add $20 to $60. For numbers that are more relevant to our area, your best bet is to get a quote from a trusted Abilene fence company.
I once took on a massive fence project on a two-acre property with hilly terrain and a bunch of gates. After spending a full Saturday just trying to prep one section, I realized I was in way over my head. Calling in a pro was the best decision I made. They knocked it out in two days—a job that would have taken me two weeks—and the finish was absolutely perfect.
So, what's the verdict? If you have more time than money and you genuinely enjoy the work, DIY is a fantastic way to save a few hundred bucks. But if you want a guaranteed, professional result without sacrificing your weekends, hiring a pro is worth every penny.
Your Fence Staining Questions Answered
Even the best-laid plans run into a few questions once you get started. I’ve been staining fences in and around Abilene for years, and I’ve heard just about everything. Getting the right answer can be the one thing that saves you from a costly, frustrating mistake.
How Long Should I Wait to Stain a Brand New Wood Fence?
This is probably the most common—and most critical—question I get. The answer is simple: patience. New pressure-treated pine, which is what most fences are made of around here, needs time to dry out completely.
I tell my clients to wait at least 4 to 6 weeks. Honestly, it can sometimes take up to three months, especially if we’ve had a wet spring.
There’s a simple trick I use called the "sprinkle test." Just splash a bit of water on a few different fence boards.
- If the water beads up, the wood is still full of chemicals from the pressure-treating process. It’s not ready.
- If the water soaks in after a minute or two, the wood pores are open and you’re good to go.
Jumping the gun and staining too soon is a recipe for disaster. The stain can't soak into the wood, so it just sits on top like a coat of paint. I guarantee it will start peeling within a year, and you’ll be out all that time and money.
What Is the Best Time of Year to Stain a Fence in Abilene?
Here in West Texas, the weather is the real boss of any outdoor project. You can't just pick a free weekend and go for it. The perfect windows for staining a fence are always spring and fall.
You’re looking for a solid stretch of a few days that meet these criteria:
- Moderate Temps: Anything between 50°F and 90°F is the sweet spot.
- Low Humidity: The stain cures much better when the air is dry.
- No Rain: You need a clear forecast for at least 24-48 hours after you finish.
Trust me, I've learned the hard way not to stain under that scorching summer sun. The stain "flash dries" on the surface before it can penetrate the wood, leaving behind ugly lap marks and a blotchy finish. Staining when it’s too cold or damp is just as bad—the stain gets sticky, stays tacky, and never seems to cure right.
I never even start my prep work without checking the 10-day forecast. When I see that stable window of mild, dry weather, that's my green light. Rushing a job between rainstorms or during a heatwave is just asking for trouble.
My Old Fence Is Gray and Has Green Spots. Can I Stain Over It?
That’s a hard no. You absolutely cannot stain over that. That gray, silvery look on an old fence is just dead, oxidized wood fibers. And those green or black splotches? That’s almost always algae, mildew, or mold.
Trying to stain over it is like painting over dirt. The stain has nothing to cling to, so it's going to flake and peel off in no time—sometimes in just one season. You’ll end up right back where you started, but with an even bigger mess to fix.
You must clean that fence properly first. That means getting a good wood cleaner and probably a dedicated mildew treatment for those green spots. A pressure washer on a low setting (around 1,500 PSI) is your best friend here. The whole point is to wash away all that grime and dead wood to get back to the clean, healthy wood underneath. Your fence should look bright and almost new before a single drop of stain touches it.
Can I Just Use My Leftover Deck Stain on My Fence?
Yes, most of the time this is perfectly fine—in fact, it can be a great idea. Deck stains are formulated to be incredibly tough. Think about it: they have to stand up to foot traffic, pooling water, and constant UV rays.
A high-quality deck stain is more than tough enough for a vertical surface like a fence, which takes a lot less direct abuse. I often use premium deck stains for fence projects because I know they’ll provide a more durable, longer-lasting finish.
That said, it never hurts to take 30 seconds to read the can. Just double-check that the manufacturer recommends it for all exterior wood, including fences. But in my experience, it’s a smart move that gives you a finish built to last.